How do I Adjust a Sprinkler Head?
Posted on September 23, 2014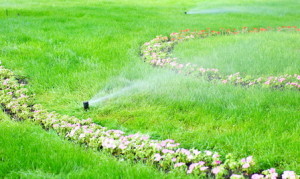
sprinkler water on the green grass lawn
As time passes, sprinkler heads will need to be adjusted. Because of repeated use, sprinkler nozzles can come loose and become turned, spraying in the wrong direction. Dirt and debris can also become lodged in sprinkler heads, causing poor coverage.
As a homeowner, you can do a simple check of your sprinkler system by turning on a single station at a time. We recommend that you check your sprinkler system on a monthly basis. The majority of newer controller models have a test function that you can use to check your system. Most are preset to run for two minutes per station. You can simply walk through your property as each station runs and examine the sprinkler heads to see if they are spraying where they’re supposed to be spraying and adjust them as necessary.
When it comes to adjusting sprinkler heads, it is much easier, and quicker, to do it when your sprinkler system is running. There are two main types of sprinkler heads to adjust, spray heads and rotary (rotor) heads. Every yard will have spray heads, but not every yard will have rotor heads. Keep in mind that you WILL get wet.
Spray Heads
If the spray radius of a spray head has been shifted (spraying on the sidewalk, on the house, into the street), the first thing you’ll want to do is tighten the nozzle. The nozzle is the little top part of the spray head when it is popped up at watering. The nozzle controls the spray of the water. While the system is running, tighten the nozzle the way you would a screw or lid – righty-tighty. If after you’ve tightened the nozzle it is still not spraying in the proper direction, tighten the stem of the spray head. Again, while the system is running, hold the stem with your fingers, very carefully, and rotate it until the water is spraying in the right direction.
Sometimes the water coming from the spray head will spray too far. If this happens, use a flat-blade screw driver to adjust the screw on the top of the spray head. Tightening the screw will block some of the water flow and will shorten the distance that the water sprays. Loosening the screw will allow the water to spray a longer distance.
Other times there can be dirt or debris that becomes lodged in the nozzle of the spray head, causing some of the water to be blocked. You could have a 360º nozzle, but it is only spraying 270º. The top of the nozzle will have a tiny picture showing what type of radius the spray head is supposed to have (90º, 180º, etc.). There is no picture on a spray head that sprays 360º. Water comes out the top of a 360º nozzle and sometimes dirt or even a small snail can become stuck in the top. If this happens, use a marking flag or something similar to dislodge the debris. Since your system is running while you do this, the water pressure will help to clear the debris easily. The non-360º nozzles spray water out the side. The size of the radius determines the size of the opening on the side. If the opening is obstructed, use a credit card or key ring card to clear out any debris.
Shrub risers have nozzles just like the pop-up spray heads in the lawn and can be adjusted and cleaned in the same way. Keep in mind that it is very important to get in the shrub/flower beds to observe what direction the water is going. It doesn’t take much to cause water to start spraying on the house or onto windows.
Rotor Heads
There are several different types of rotor heads. When it comes to adjusting them, they are all different, but they are all adjusted with the same principle in mind. Most rotor heads require a special manufacture’s key for adjusting. This key comes when you buy a new rotor head or if the key is lost, you can get one from a local irrigation supply store. Each manufacturer has a different key so you’ll need to look at the rotor head to figure out its brand and model number. Fortunately, some rotor heads can be adjusted with a flat-blade screw driver.
As with the spray heads it’s best to adjust the rotors while your sprinkler system is running. Use the key or screwdriver to turn the screw on top of the rotor head. There will be arrow indicators showing which way to turn the screw to increase or decrease (positive vs negative) the spray radius. If your rotor is spraying your fence, it would be just a matter of slightly decreasing the spray radius.
Sometimes the water from a rotor head will be a big tall stream without any water being diffused to water the grass below it. (Picture water coming out of a garden hose with no nozzle.) There is another screw on the rotor head and when it’s turned “down” it will cause the water to be diffused and get it to spread out, watering all of the grass in its path.
So You Ran Over Your Sprinkler Head
Posted on July 31, 2014
Gardening. Mowing green lawn with red lawnmower in spring day.
So you’ve run over your sprinkler head with your lawn mower and broke it. Now what??
Not to worry…one of our most common repair requests is a broken sprinkler head, and during the summer months this request increases as the amount of yard work increases. There are a couple of options, you can either tackle the repair yourself or have a licensed professional fix it for you.
If you hire a sprinkler person to fix the broken head, be sure that they are licensed with the Texas Commission on Environmental Quality (TCEQ). The TCEQ regulates this industry, and if it’s not the homeowner working on their own system, the rule is that anyone repairing any system other than their own must be licensed. This helps to protect the homeowner. Now, if the situation is that your landscaping guys broke a head, most will say that they can fix the sprinkler head, but only a few are actually licensed to do the repair. If you don’t know, just ask. We’re all required to carry our licensing card with us while on a job.
Hiring a professional to repair a sprinkler head is not an expensive repair, in fact, it’s one of our cheapest repairs. We have a one hour minimum for a service call, and most sprinkler heads can easily be replaced within that hour. Keep in mind that it may take a bit longer if the sprinkler head is surrounded by tree roots or in an area that is difficult to access.
If the sprinkler head can’t be repaired before your next watering day, you can still use your sprinkler system, but water will definitely be running down the street or pooling in your yard or flowerbed. This will use extra water and likely cost more money on your water bill as the water will be flowing unopposed. Depending on where in the zone the broken head is, it may also cause some of the other sprinkler heads to not get enough water to spray how they are supposed to spray.
Basic steps to fix it yourself…
- Determine which sprinkler head and nozzle to buy. You don’t necessarily need to replace the sprinkler head with one made by the same manufacturer, but you do need to make sure it’s the same height, size, spray radius, etc. This information can be found on the top of the sprinkler head, but if it’s too damaged, take a look at another sprinkler head in your yard with the same spray pattern.
- Dig out the broken sprinkler head. Use a shovel to cut about one foot around the sprinkler head. Be very careful to dig slowly and not too deep. Digging aggressively or too deeply could damage the piping…making more work for you! Once you’ve cut around the sprinkler head, remove the sod layer, lifting it straight up. Then use a hand trowel to scoop out the dirt around the sprinkler head – scoop out enough so that you can get both hands around the head.
- Unscrew the old sprinkler head. Turning counterclockwise, unscrew the sprinkler head. Be careful that dirt doesn’t drop into the connection once you’ve taken the head off. If dirt does get in, flush it out by letting water run through it until it’s clear.
- Screw on the new sprinkler head. Once the connection is clear of dirt, screw on the new sprinkler head. Check for leaks before replacing the dirt and sod.
- Set the nozzle. Lift the cap and grasp the stem carefully with your fingers. Thread the nozzle onto the stem and screw it into place. Test it to make sure the water is spraying the right way. If not, adjust the nozzle.
Summer Landscape Lighting
Posted on July 17, 2014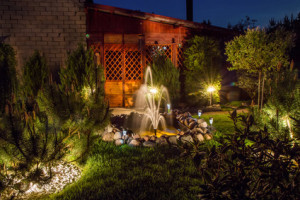
Fine evening, lit by the fountain in the garden
Despite the intense heat here in our North Texas service area, the summer is a wonderful time to spend outdoors, especially the evening and early nighttime hours. Whether your idea of a great time outside consists of socializing, relaxing, cooking, exercising, or even working,landscape lighting can prolong the hours spent outside, well into the night.
Landscape lighting can be used to accent areas to be appealing when it’s dark outside and aid in outdoor activities. Things such as ornamental trees, a fountain, rocks, or artwork can be highlighted to be visible from the house or other areas in the yard such as the patio or swimming pool. Adding light fixtures at specific points along the fence as well as along a path, can add dimension and visual interest to your yard. Light can be directed from a tree above to the patio below to give the effect of moonlighting during a late evening meal. Unique light fixtures can be installed to illuminate a cooking area, making it accessible even after the sun has set.
Typically, it is easiest from a design stand point to create a lighting system from scratch rather than adding to an existing system. This is because the existing lighting system may be old and worn out and fixing it would be more costly than starting from the beginning. But if your existing system is in good condition and installed properly with care and know how, being able to add lighting fixtures is highly likely. It’s just a matter of determining what already exists, what capacity of the existing system has been used, and how much more can be added.
Lighting is more than just popping in some lights here and there. We take time and care in designing a lighting system that is right for your property and your lifestyle so that it enhances how you use your outdoor living space. If you use your outdoor space to entertain families and kids of all ages, adding colored lighting in or near pool and water feature areas may be right up your alley. Or maybe you prefer the tranquility of the rustling leaves in the breeze, in which case, moon lighting from above in various parts of the backyard could provide a nice relaxing atmosphere.
Whatever your imagination can visualize, landscape lighting can create it!
New Trends in Sprinkler Design for 2014
Posted on June 25, 2014 Although it has been around for years, the newest major trend in sprinkler design so far for 2014 has been, without a doubt, Water Conservation! Because of the severe drought that our service area has been in for at least the past year, watering restrictions have escalated to the point where most cities are only allowing watering with an automatic sprinkler system once every two weeks, through the end of October. Although we are not yet in a Stage 4 situation (no watering at all), the possibility of entering into Stage 4 could be right around the corner at any moment.
Water conservation has gained popularity for two reasons. 1 – We can’t water as often so we want to make sure that all of the water goes where it is supposed to go. 2 – Water is money, and wasted water is wasted money. As homeowners have become more aware of and concerned with water conservation, we have noticed main areas where cities and their residents have adopted new practices or changed their old habits.
Drip Irrigation – this has been the biggest push of 2014. Most cities allow watering using drip irrigation with no restrictions. Some cities limit it to up to two hours each day, but still, that’s fantastic! As restrictions have become more severe, many homeowners have made the jump to drip irrigation in their flower beds and along the foundation of their house.
Rain & Freeze Sensors – most, if not all cities in our service area require that a rain & freeze sensor be installed on residential sprinkler systems. The rain & freeze sensor does not allow your sprinkler system to water while it is raining. It is also designed to dry out as your lawn dries out so that it doesn’t water when your lawn can’t hold anymore water (water runoff). Most cities require that a rain & freeze sensor is installed on all new sprinkler systems; however, many cities require that one be installed when a controller is replaced on an existing system, or even when something is repaired on an existing system. Check out your city’s website because several cities have a rebate/incentive program.
Better Separation of Zones – many homeowners are realizing the benefit of having more zones in their sprinkler system. Example, if a shady area and a sunny area are watered on the same zone, the shady area will become saturated more quickly than the sunny area, causing water to runoff into the streets as waste. Although it’s more money upfront, installing a new valve and piping, in the long run, it saves water and money. Separating zones also helps to maximize watering benefits when we only get to water once every two weeks. The flowerbeds will get the water they need and the grass gets what it needs.
Parkways – because parkways are so narrow, it is often that the pop-up spray heads spray beyond the grass and onto the road or sidewalk. As a result of this, some cities have required that only drip irrigation be used in the parkways of new sprinkler system installations. This helps to limit the amount of water that is wasted during each watering session, and of course, saving money.
Soak & Cycle – we have witnessed more and more homeowners adopting the Soak & Cycle technique. If your yard needs to get 30 minutes of precipitation, instead of watering once for 30 minutes, try watering four times for 7 to 8 minutes with a 30-minute to one-hour gap in between each watering. This allows the clay soil to absorb the water that is applied to it without the water running off. After about 7 to 8 minutes, the clay soil’s ability to absorb the water decreases and that is when your system should cycle to the next station while the previous area has time to absorb the water that was just applied. Once the system comes back around to this area, the area will be ready to absorb more water. Repeat this process three to four times and your yard will retain and actually use much more of the water that you are applying.
Sprinkler System First Steps
Posted on June 10, 2014 Automatic sprinkler systems are a wonderful convenience to have on your property. No more dragging that hose around every week (or every other week in many areas) to water your lawn, flowerbeds, foundation, etc.! You may be interested in a new sprinkler system because there isn’t one installed on your property, or the one you do have is in such a state of disrepair that it would actually be financially better to call it quits with the old one and start from scratch. Whatever your reasons for wanting one, there are different options and possibilities when it comes to installing a new sprinkler system.
What to Think About Before Calling for Estimates
Will there be any significant alterations to your landscape? If you are planning on adding new flower beds, changing the boundary of existing beds, building a shed, adding a pool, planting trees, building a patio, etc., then it is important to have this planned before installing a new system. A new sprinkler system can be installed before or after a landscape change, but the main thing is that it is coordinated and that all of this information is communicated to the Licensed Irrigator who is stalling the sprinkler system. In a perfect world, it is easiest to install a sprinkler system after major landscape changes have taken place, but before delicate things, such as flowers, are planted.
How many zones would you like to have? There is not enough water pressure to water your entire property at one time. Thinking of your lawn, typically a property has a couple zones in the front yard, a couple in the back yard, likely one on the side yard. Large open areas can be covered by rotary spray heads that can cover a large area; however, they would need to be on a separate zone from the pop-up spray heads used along fences, walkways, in parkways, etc. Flower beds and shrub beds tend to be on separate zones as they may need more or less water than the grass next to them. Drip irrigation is a great option for your flower beds and foundation; however, they need to be on a separate zone from spray heads. Good rule of thumb – same equipment, same zone, different equipment, different zone. Are there areas that stay wetter longer than other areas? If so, you may want these areas on a separate zone so that they are watered less often. The Licensed Irrigator that you choose to install your sprinkler system will know about all of these items and can configure a system that works best for you and your property.
Have a Rough Budget in Mind. A sprinkler system is a major purchase and a major undertaking on your property. Many people have a bit of sticker-shock at the actual cost of a sprinkler system. Installing a new sprinkler system can range anywhere from $2,000 to above and beyond $4,500. The main thing to keep in mind with the price is that “it all depends.” It all depends on property size, type of landscaping, the number of zones (more zones = more $$), the type and quality of products used, and if there are special designs to be implemented.
When You Call for Estimates
Get at least three estimates from different companies. Most companies offer free estimates for new sprinkler system installations. Also, most companies should ask that you be at your property when they come by to take measurements and make notes. This is so that they can ask you questions about your property as well as what your needs, preferences and priorities are. Have a vague idea of what you want. An experienced and professional person should be able to effectively walk you through the process; however, it is good to have a feel for it before hand. Be sure to ask if they are Licensed Irrigators. The Texas Commission on Environmental Quality (TCEQ) requires that a sprinkler system is installed by a Licensed Irrigator. It is a criminal offence if they are not licensed. Ask the people preparing the estimates lots of questions…products, time to complete, planned zones, permitting, backflow testing, etc. It is ok to share the plans of one company with another during the estimate process, but keep the price a secret. It’s important when it comes time to compare estimates, that you are comparing apples to apples.