

What to Do If a Sprinkler Head Won’t Go Down?
Posted on April 28, 2014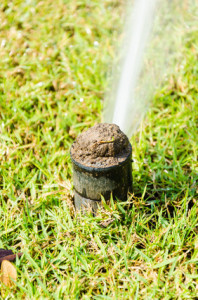
Sprinkle on green grass garden
So today is your watering day. You have set your sprinkler system to run during the nighttime hours because you know that is best. You wake up in the morning wondering if the sprinkler system worked. You look outside and yup, it worked, fewf! How did you know it worked? Was it the water droplets on your grass? The wet look of the walkway? Nope and nope. It was because the sprinkler heads were still sticking up!
When your sprinkler heads (one, several or all) stay up and won’t go down after a specific zone is finished watering or after the sprinkler system has turned off, something isn’t working properly. No need to worry…it’s typically a quick and easy fix!
Leaving a sprinkler head in the up position runs the risk of the sprinkler head being broken by a lawnmower, car, child, or toy. When this happens, it quickly turns into a job requiring more physical labor – digging up the sprinkler head and replacing it.
Pop-up sprinkler heads are designed to do just that, pop up. When the valve is electronically opened by the controller in your garage, water rushes through the valve and piping, like water through a gate and tunnels. This water pressure is what causes the sprinkler heads to pop up above the ground and grass and spray the water. When the water stops, the sprinkler heads are supposed to retract nicely and smoothly back into the ground, but sometimes the sprinkler heads can get stuck.
The Most Common Reason for Relatively NEW Sprinkler Heads to not go down is that there is dirt or debris caught inside the sprinkler head. Dirt, grass clippings, leaf pieces, and small rocks can become lodged in the small space between the pop-up nozzle and the body of the sprinkler.
How to clean out a sprinkler head yourself…
- Unscrew the cover from the sprinkler head. Remove the nozzle and spring assembly from the body of the sprinkler head.
- Clean any debris from the inside of the sprinkler body or on the nozzle mechanism. Rinse the components with water and wipe them down with a rag.
- Turn the water on to the station controlling the sprinkler head. This will force out any dirt or debris that may be the cause of repeated sticking after reassembly.
- Reinsert the spring and nozzle mechanism back into the sprinkler head. Screw the cover back onto the sprinkler to secure the nozzle.
The Most Common Reason for OLDER Sprinkler Heads to not go down is that they are just simply worn out. As we get older, there are things that we just can’t do as we did when we were younger. Same goes with sprinkler heads. If after cleaning the sprinkler head it still does not go down on its own, it’s time to replace the sprinkler head. This is a slightly more complicated process than the cleaning.
How to change a sprinkler head yourself…
- Cut through the lawn surrounding the sprinkler head, about six inches all the way around. Do this very carefully and slowly so as not to break the water line.
- Pry up the section of grass using a hand trowel or small shovel and set aside to replace later.
- Carefully dig away the dirt surrounding the sprinkler head. Set the dirt in a pile nearby to use to refill the hole later. Dig down carefully until you reach the water supply pipe.
- Once you have cleared all the way down to the riser (a short vertical pipe connected to the water supply pipe), unscrew the old sprinkler body and remove it. Don’t let dirt fall in to the opening.
- Obtain a replacement sprinkler head.
- Wrap a thin coating of Teflon tape around the threaded male end of the riser. Screw in the new sprinkler body until it is hand-tight.
- Turn on the sprinkler line for just a moment to blow out any dirt that may have fallen into the line.
- Turn off the sprinklers, then using the flush-plug ring, pull up the riser, unscrew the flush-plug, put in the plastic filter screen and screw on the nozzle.
- Twist the nozzle to align the spray pattern so it sprays onto the lawn, not the sidewalk, road or walkway.
- Replace the dirt back into the hole, packing it down around the sprinkler body.
- Replace the turf and push it down around the sprinkler head.
- Turn on the sprinklers to check that everything is spraying correctly.
Please keep in mind that if at any point you do not feel comfortable cleaning or replacing a sprinkler head, please do not hesitate to contact a licensed professional for help. We would be more than happy to help you!
How Can I Tell if I Have a Water Pressure Issue?
Posted on April 14, 2014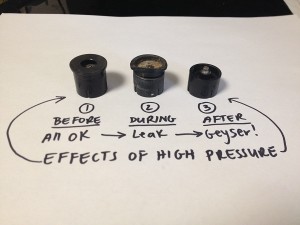 In addition to shifting soils, prolonged freezing temperatures and pesky squirrels, high water pressure is a major culprit when it comes to causing damages to a sprinkler system. Water pressure can make or break a sprinkler system. The system itself and designed for a specific range of water pressure. Different types of spray heads require different amounts of water pressure, and as the piping moves away from the zone’s valve, the water pressure will decrease.
If your sprinkler system is operating at optimum pressure, then the water being emitted from the spray heads will be in a droplet form, resembling rain. The droplets will have enough weight to fall to the ground, to penetrate the soil and to reach the outer edges of the spray head’s radius before being evaporated by the sun and/or light wind.
Low Water Pressure – If you have a zone where the spray heads are not popping up completely, this could indicate one of two things. Most likely there is a leak and the leak is robbing the pressure to adequately run the zone properly. This could also signify that this zone is not configured properly and that there are too many heads for the amount of water pressure. When low water pressure is in the picture, the water droplets coming from the spray head will not have the momentum to travel the distance that the spray head is designed for. This will give the appearance that there is a coverage issue, causing homeowners to either overwater or feel that they need to add additional spray heads to the zone.
High Water Pressure – You may not know it, but we have all witnessed a sprinkler system in action with high water pressure. If you see excessive misting or fogging at the spray heads, then the water pressure is too high. With the much smaller water droplets, a lot of the water will be evaporated or blown away before being absorbed into the soil. As with the low pressure, when this happens, it will appear that there are coverage issues with the sprinkler system, when in fact the pressure is too high. Also, high water pressure puts a lot of stress and wear-and-tear on sprinkler system components, causing the need for more repairs. High water pressure can break sprinkler heads causing geysers, it can break pipes causing leaks, and can also cause valves to fail and not perform properly.
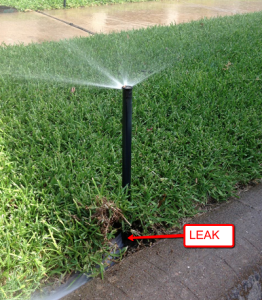 Having a water pressure issue, whether it’s a lower pressure issue or a high pressure issue, can undoubtedly cost you money…money in the form of wasted water, dead vegetation, your time, and potentially costly repairs.
Solving a water pressure issue can be as simple as installing a pressure regulator onto your sprinkler system.
Drip Irrigation Benefits and Restrictions
Posted on March 21, 2014 As watering districts and cities in our service area are maintaining watering restrictions or proposing to institute new restrictions, drip irrigation is beginning to become an alternative that many people are becoming more and more interested in for their gardens, flowerbeds and foundations. When watering restrictions are in place, most cities allow watering using drip irrigation when aboveground watering is not permitted. The permissible use of drip irrigation can differ city to city and can range from no restrictions at all to being allowed for up to two hours per day.
Creating separate zones for drip irrigation will allow for a more precise and frequent watering schedule. Drip irrigation is a great alternative to standard pop-up, rotor or other above ground sprinkler heads for several reasons.
- Water droplets will stay off plant leaves. Droplets of water act like a magnifying glass and can actually burn a plant when the sun’s rays are intense.
- Water will promote root growth by getting water directly to the roots. Excess water sprayed on top of the ground typically does not travel deep enough into the root zone to promote root growth.
- Easier to protect the foundation of the house. Being able to have more freedom when watering will allow the foundation to get water when it needs it to maintain its equilibrium.
- Watering is not restricted. Plants will actually receive more water than watering with a sprinkler system twice per week and watering can be scheduled for any time of the day.
- Watering will be more efficient. Rather than watering the entire plant and surrounding soil, water is applied directly to the area of the plant that needs it, the roots.
- Water usage will be reduced. By not wasting water that is over sprayed beyond the flower beds and gardens and by directing the application of water to the root zone, water usage will actually be reduced.
Although drip irrigation has very few restrictions, if any, some cities in our service area do recommend that property owners make it standard practice to monitor total water usage. Some cities may even require a homeowner to pay a surcharge on the amount of water if it reaches a certain number of gallons used per month.
LED Lights vs Incandescent Lights
Posted on February 27, 2014
set of incandescent, compact fluorescent, halogen, LED light bulbs isolated on white background
Back in the day, incandescent light bulbs were the only option for landscape lighting. We’ve all seen, used, changed, bought, and even broke incandescent light bulbs. They’re in light fixtures in the house and in light fixtures outside the house. But as a refresher…an incandescent light bulb produces heat with a filament wire heated to a high temperature by an electric current passing through it until it glows. The hot filament is protected from oxidation with a glass or quartz bulb that is filled with inert gas or is evacuated.
Then along came the light-emitting diode (LED). Actually, LEDs have been around since the 1960s and were originally used as electronic components; however, they did not start becoming integrated into landscape lighting until several years ago. The LED consists of a diode chip made of semi-conducting material, encased within an epoxy, plastic, resin or ceramic housing and attached to the electrical circuit and light is emitted when an electric current passes through it. One filament is used in an incandescent light bulb, whereas several LEDs are used to make up a LED lamp.
Previously, using LEDs in landscape lighting involved using different equipment and more equipment than what was used for incandescent light bulbs. Retrofitting an existing lighting system formerly required new fixtures, new equipment and LED drivers in order to switch from incandescent light bulbs to LEDs. Recently, the LED landscape light has evolved – there are now “incandescent” light bulbs equipped with an LED in place of the filament within the light bulb. It looks like an incandescent, fits into a fixture like an incandescent; however, it’s an LED! This evolution has drastically cut down the cost of retrofitting an existing landscape lighting system to use LEDs and has also cut down the cost of installing a new LED system.
LEDs are more expensive than their incandescent counterpart; however…
- LEDs will last longer than incandescent light bulbs;
- Increased life means that LEDs will need to be replaced less often;
- The less often LEDs are removed from fixtures, the longer the fixtures will last;
- LEDs require less energy than incandescent light bulbs (LEDs are more energy efficient);
- Decrease in energy requirements means that more LEDs can be added to a landscape lighting system;
- Decrease in energy requirements means that you can use a smaller transformer;
- LEDs emit more light per watt than incandescent light bulbs;
- Increase in light emitted means that when incandescent light bulbs are replaced with LEDs, the dimness of the incandescent light bulbs will be replaced with the brightness of LEDs;
- LEDs radiate very little heat when compared to incandescent light bulbs;
- LEDs are difficult to damage with external shock (jarring and bumping), unlike incandescent bulbs, which are fragile;
- Aside from the initial operating cost of LED lights, the annual operating cost of LEDs is approximately 1/10th of an incandescent light bulb
When it really comes down to it, using LED or incandescent bulbs and their respective equipment and fixtures is all about personal preference. There are pros and cons to both (cost versus energy efficiency), and it’s up to the consumer to weight what is important to them and base their decision on that.
Expressing Personal Style through Landscape Lighting
Posted on February 14, 2014
Swimming pool and Moroccan Garden at night
Many clients of ours prefer to infuse a little personal style when designing a landscape lighting system for their property. There are a wide range of decorative fixtures, colored lenses, light diffusing lenses, etc. that are available to accomplish this. When people consider landscape lighting, they picture flowerbeds, trees, pathways, and decorative uses. Those are just the tip of the iceberg when it comes to the many ways to express your personal style through landscape lighting.
You can design a low-voltage lighting system exclusively for your outdoor kitchen or patio area where you may only want to illuminate specific features. Some prefer to illuminate decorative trees or shrubbery. Depending on preference, this can be done by installing lights at the base of the tree. This will give a nice effect by illuminating the base and under-side of the limbs. This can be improved by installing three lights at the base of the tree in order to achieve a three-dimensional appearance. Another option is to install the light fixtures up in the tree. This is more intensive; however, the effects are spectacular! When designed properly, this will give the effect of a strong moonlight shining through the trees. It produces a nice light with the shadows of the tree limbs appearing on the ground surface below.
Many like to express their style by simply illuminating decorative features such as art, fountains, ponds, stone work, etc. You can add several lights to make your entire property bright and safe at night, or you may prefer to add just a few fixtures in the flower beds to provide a “wall-wash” type of effect. This is a nice effect by showcasing the house without lighting up everything else. There are some clients who just want to install one light to illuminate the property address.
Another example is a client who installed six fixtures on the eaves of the house in the backyard to shine down around the backyard. This client wanted to install green lenses in the fixtures to provide a tranquil and calming effect.
When it comes to the fixtures themselves, there are many, many types and designs. There are modern, sleek fixtures, or traditional fixtures, or more elaborate fixtures. They come in different sizes, finishes and colors. Copper fixtures become more and more beautiful with time as they oxidize and develop a unique patina from being exposed to the outdoor elements.
As you can see, when it comes to expressing your style through landscape lighting, the possibilities are endless. If you can imagine it, then it can become reality!
